
Hello Stampers!
For those of you who don't know me my name is Leigh S-B and I'm a designer for Blockheads Paper Arts :0) I'm here today to share my thoughts on a brand new permanent marker that is going to be very popular!
If you've been wanting to join the Copic craze but found them a tad pricey for your crafty budgets then you'll be very excited about these worthy rivals! Marvy Le Plume Permanent markers are here and lucky for you Blockheads has them! Stacey has already introduced you to them and shared some great tutorials with you already and I've been having a blast testing them out and I'd like to share my thoughts about them with you too.
Just like Copics, Marvy Le Plumes are permanent alcohol based ink markers that are perfect for stampers! The main difference between the brands is that the Le Plumes are non-refillable, single nib markers and you can't replace the nibs but at half the price of a Copic marker I think I can live with that ;0) I even compared them to the Prismacolor permanent artists markers, which I dislike coz I'm not a fan of the tiny hard nibs so I concluded I prefer the Le Plume Permanents over Prismacolor hands down!
141 colours are available in the permanent range. There's also White, Gold and Silver markers but those 3 are opaque, pigmented and water-based.
The recommended ink pad for use with Copics is Memento and the same applies for the Le Plume Permanents. They don't cause any bleeding or smudging on stamped images so you can colour right over the lines with no worries.
The Le Plume Permanent nibs are brush-like but are more bullet shaped with less of a tapered end when compared to Copics. I'm a big Copic user so I immediately spotted the difference, however, it just took me 15 minutes of playing around with them to get a feel for how much pressure or paper contact with the tip of the nib was needed before too much ink was applied and over bleed of the stamped lines occurred. But I had the same learning curve with my Copics though when I first started to use them too. It just takes a bit of practice and then you're well on your way! But don't let that scare you....remember when you first inked up a rubber stamp and couldn't get a good impression? Well, it's the same deal, just a bit of practice is all you need!
When I first tested the Le Plume Permanents I did find that some of the markers seemed more wet than others but that seemed to resolve the more I used them, just one or two test samples was all it took for me really. I recommend printing out the Blank Chart created by Blockheads Paper Arts and colouring in the relevant blocks when you first get your markers. That way you'll absorb some of the excess ink and will be ready to go onto your practice samples. You might never find that a problem though and it probably just depends on whether a particular pen was over-filled at the factory or not.
One of the 141 markers is a colourless Blender Pen. The Le Plume Permanent Blender works exactly the same as the Copic Blender and can be used for blending, creating special effects as well as an awesome mistake corrector! It worked really well at removing some of the over-bleed when the ink spread a bit beyond the stamped lines. It's very important to know that the Blender Pen acts more like a bleach and removes colour! The blending of colours is preferably done with the lighter marker in the colour range you're using, which is also true for Copics too.

I also had the opportunity to play with the White and Gold markers and both are awesome. They have fine plastic tips and the Le Plume White is a nice companion pen to the white gel pen I use coz you can get bigger dots quickly with the Le Plume and I really like the instant opaque ink.
Stacey and I worked very hard at creating some fantastic Blending Sets consisting of 3-4 markers for you to start your collections as well as a Starter Set of 46 markers of the most versatile colours just in case you want to dive right in! There's an awesome Colour Chart for you to drool over and don't forget to print out the Blank Chart too!
But if your not sure if these markers are right for you or your crafty budget allows you only to start with 3-4 markers then don't worry coz my first tutorial "Passion For Purple" which will be out this week will demonstrate just how much fun and use you can get out of one blending set! I have no doubt you'll be hooked ;0)
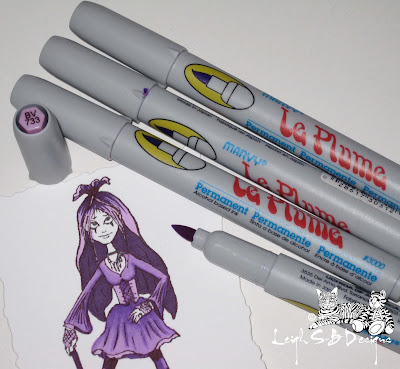
The coloured image I'm using for my Blending Tutorial can be seen on my blog at Leigh S-B Designs, I made a very purple Halloween card called "Miss Purple Poison" ;0)
Attention die hard Copic fans! In case you didn't know, Blockheads Paper Arts is now also carrying the Copic Sketch markers!
Stacey has provided a Colour Comparison/Substitute Chart for those of you who want to start with the Marvy Le Plumes and then switch them out with Copics when you need to replace them or for Copic uses who want to follow along with our tutorials and would like to know the marker equivalents!
Keep a close eye on the Blockheads blog and newsletters for more Marvy Le Plume Permanent Markers news and tutorials!
Thanks for stopping by!
Leigh S-B
THE SHARPIE DOMINO QUEEN
No comments:
Post a Comment