Showing posts with label Tutorials by Leigh S-B. Show all posts

Wednesday, June 20, 2012

Melt Art Fun continues with Ranger's Texture Treads!


Created by: Leigh Snaith-Brunton aka The Sharpie Domino Queen and Design Team Member

I've been having a fantastic time playing around with Ranger's new Melt Art Floral Flourishes Texture Tread.  Last week I showed you how to make a unique bracelet with gold UTEE and now today I've got an elegant pendant to share that I made with clear UTEE and a surprise ingredient mixed in!

Supplies Used:  
Ranger Melting Pot
Ranger Melt Art Texture Tread - Floral Flourishes
Clear UTEE

Please visit my full blog post at Leigh S-B Designs for the instructions for this unique jewelry piece!

Friday, June 15, 2012

Melt Art Fun with Ranger's Texture Treads!


Created by: Leigh Snaith-Brunton aka The Sharpie Domino Queen and Design Team Member

I've been having a fantastic time playing around with one of Ranger's new Melt Art Texture Treads.  I've got a variety of projects to share using the Floral Flourish Texture Tread which is now available through Blockheads Paper Arts.  They have 4 of the 6 available designs for you to choose from.  If you haven't played around with UTEE for a while you're going to want to dust off your Melting Pots and give these new Texture Treads a whirl!

Supplies Used:  
Ranger Melting Pot
Ranger Melt Art Texture Tread - Floral Flourishes
Gold UTEE

For step by step instructions for this unique bracelet please visit my full blog post on Leigh S-B Designs.

Wednesday, April 18, 2012

Create amazing effects with Perfect Pearls, Peacock Feathers and Silver Embossing Powder!

Created by: Leigh Snaith-Brunton aka The Sharpie Domino Queen and Design Team Member

Description: Patina Perfect Pearls and Silver Embossing Powder were used to make a Peacock Butterfly gift box with a matching card and a Square Domino Pendant demonstrating various techniques to create a variety of different effects! 

Stamp Sets Used:
Painted Butterflies and Proud As A Peacock

For step by step instructions for these projects, please visit my full blog posts at Leigh S-B Designs and the DominoART Blog: 


Wednesday, March 14, 2012

"The Architect Fairy" & "The Isle of Aud Parade" - 2 Cards featuring Lost Coast Designs Rubber Stamps by Leigh S-B!


Created by: Leigh Snaith-Brunton aka The Sharpie Domino Queen and Design Team Member

This week I'm featuring Lost Coast Designs Rubber Stamps and I've got two projects to share with you.

Lost Coast Designs Stamps Used:
Winged Girl, Isle of Aud Animals, Zebra Border and Tree Branch Background.
All of these are available at Blockheads Paper Arts!

For step by step instructions for both of these cards please visit my blog, Leigh SB Designs:


Thursday, December 8, 2011

Naughty Christmas Mice - Wood Ornament featuring Sharpie Coloured Game Pieces by Leigh S-B

 Happy Friday Everyone!

Last week I shared my tradition of making porcelain Christmas tree ornaments with you all and now I'm back today with another two-sided Christmas ornament but this one is a lazor-cut wooden one with a two sided Sharpie coloured game tile center piece!  I decorated each side differently to show you two looks in one but you can make both sides the same if you want to of course!


The two naughty mice causing havoc on the Christmas tree from Blockheads Paper Arts' Figgy Pudding stamp sheet are the featured images on the Lexigo game tiles.  I used the mice from the top left stamp!


I also used Distress Stains, Fireworks Ink Spray and Smooch Spritz to create this whimsically playful yet elegant ornament!

Please pop on over to my blog, Leigh S-B Designs, and check out how I went about creating this one!


Happy Holidays!

Thursday, November 24, 2011

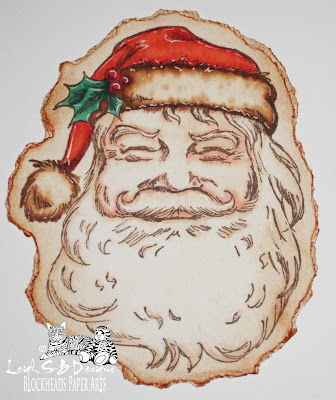
How To Colour A Vintage Santa - Marvy Le Plume Permanent/Copic Markers Tutorial by Leigh S-B!

Happy Thanksgiving Everyone!

I'm super delighted to be back today with another Marvy Le Plume Permanent markers 'How To' tutorial!  I'm featuring the Marvy Le Plume Permanents in a series of tutorials but you can follow along easily with Copic markers too!  Stacey, the wonderful owner of Blockheads Paper Arts, has provided a great Marvy to Copic substitute Chart to take the guess work out of it for you!  So grab your markers and lets get started on 'How To Colour A Vintage Santa'!


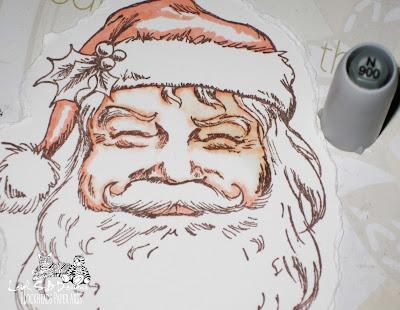
In this tutorial I'm going to show you how to colour this gorgeous Santa image which is on the exclusive Blockheads Paper Arts An Illustrated Christmas stamp sheet by mainly using the Marvy Le Plume Permanent Blending Pen N900 (or Copic 0 Colourless Blender) to blend and soften the colours.  This is a great technique for colouring 'white' areas in your stamped images for a beautiful subtle effect!


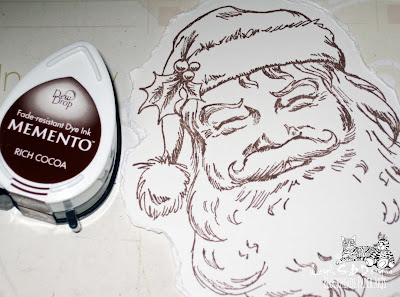
Stamp Santa onto Neenah Solar White cardstock with Memento Rich Cocoa ink.
I tore the edges of my Santa coz I was going for a vintage distressed look for the card I used him on.
You can see my finished card on my blog at Leigh S-B Designs!

We are going to use the following Marvy Le Plume Permanent markers:
N900 Blending Pen
Red (R) 812, R815, R817
Orange Red (OR) 823, OR827
Orange Yellow (OY) 848
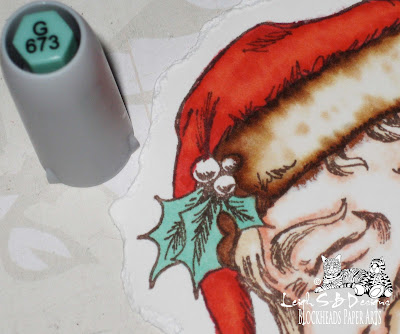
Green (G) 673, G679
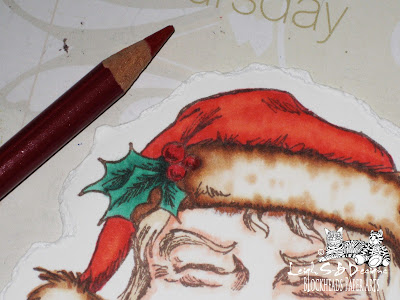
as well as a red Prismacolor pencil, a white gel pen and Tea Dye Distress Ink


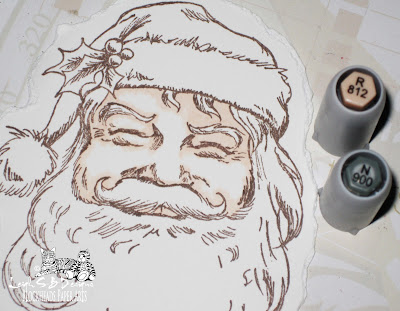
Apply R812, which is a pale flesh colour, by outlining just the stamped lines of the face and filling in more of the 'shadow' areas.  I decided my light source was coming from the front and slightly to the left so the right side of Santa's face will be more shadowed.  Go over all the colour with the Blending pen (N900) to soften the harsh edges.  Don't worry about going over the stamped image because the Memento ink doesn't smear and is perfect for use with alcohol-based markers.


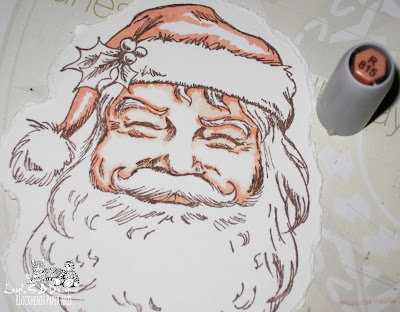
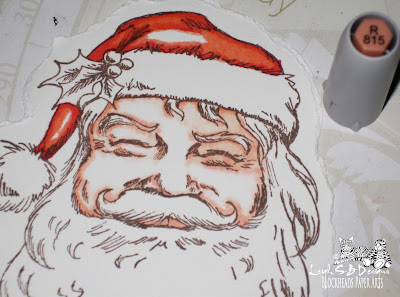
Apply R815 to the same areas of the face but concentrate more on where the 'shadows' would be.  So mainly along Santa's brow where his hat sits, his eyebrows coz remember he does have bushy eyebrows, the creases of his eyes, nose and along his beard line.  I also started on his hat at this point.  I used R815 as the highlight areas on his hat so I started with the lightest colour.


Back to the face - blend all the R815 areas with the Blending pen.


Back to the hat - build up the colour on Santa's hat with R817.
 

Blend all the R817 areas by using R815 as the blending tool instead of the colourless Blender this time.
 

I added more R817, blended with R815 and did the same again until I was happy with the result.
Usually a stamp image will indicate for you where your shadows should be with cross hatching or darker lines which darkens particular areas.  So in this case that's where I concentrated applying the darker red areas on the hat.
 

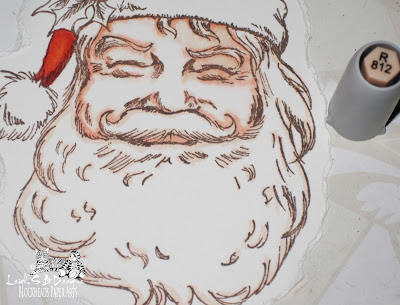
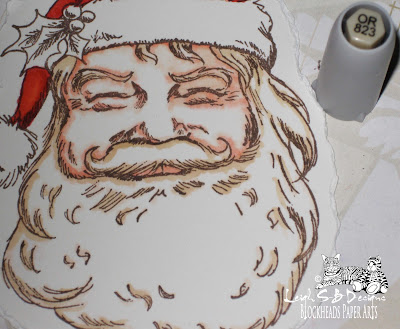
Now for his beard, mustache and eyebrows - I lightly applied R812 on and around the stamped lines of all the hair areas.
 

Go over all the same hair areas again with the Blending pen (N900) to soften the harsh edges.
 

Apply OR823 to the same areas to add shading and depth to the hair and blend again with N900 (Blending pen).
 

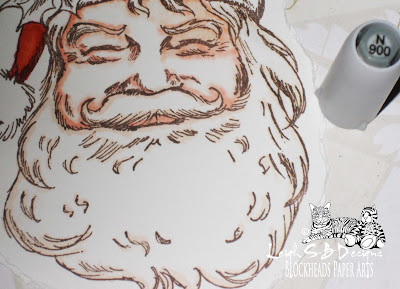
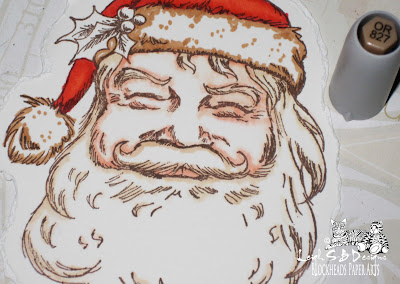
Apply OR827 to the white fluffy hat areas, concentrating the colour around the edges where the shadows would be.
 

I blended over the same areas with OR823 to lighten and soften and then further blended away the sharp edges with N900 as the first step for this area to get a feel of where I wanted the colour to be for the white fluffy areas of Santa's hat.  I'm using the sepia tones coz don't forget he's a vintage Santa!
 

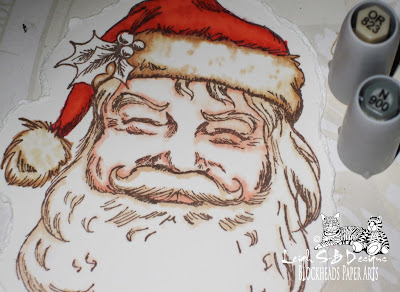
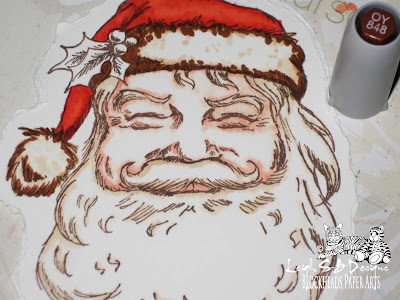
Apply OY848 for darker shading and depth.
 

Fill in with more OR827 and OR823, getting lighter towards the center of the white areas of Santa's fluffy hat.  Don't forget to work on his hat pompom at the same time!  Blend, soften and lighten the same areas with N900.

Tip:  the Blending pen acts more like a bleaching agent and will lighten and leach away colour and you can get a nice watercolour effect.  You can see that effect nicely in the white hat area in the photo below!  You can also see I got some overbleed of the brown colour into the face area coz I used the Blending pen a lot but that didn't bother me coz it just looks like a shadow cast by the fluffy hat, especially when you're not looking at the image sooo closely ;0)
 

Now for the holly - colour in all the holly leaves with G673.
 

Add shading and depth to the leaves by applying G679 in the shadow areas which is basically where all the leaf detail and cross hatching of the stamped image is and make it darker where the leaves go under the berries.
 

I wanted the berries to be appear more solid and opaque so they'd stand out from Santa's hat so I used a red Prismacolor pencil to colour them.
 

Finish off by applying highlights to the image with a white gel pen.
 

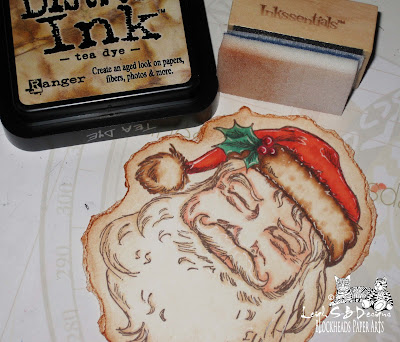
To complete my vintage Santa I aged the image by applying Tea Dye Distress Ink with an Ink Blending tool.
 

Here's my vintage Santa on the card I made for the Blockheads 'Sanded Colour Block' Technique Challenge!  There's still plenty of time to join in the challenge for a chance to win the $25 gift certificate!  You can read all about it here on the Blockheads Blog!
Then pop on over to my blog to see how I incorporated the technique into my card.

I hope you enjoyed my second tutorial on how to use Marvy/Copic markers.  Click here if you missed tutorial #1 - "Passion for Purple" which is a blending tutorial demonstrating how to colour an entire image just using 4 shades of purple!


Thanks for joining me today and have a wonderful holiday weekend!
Happy Stamping :0)

Leigh S-B
THE SHARPIE DOMINO QUEEN

Wednesday, November 9, 2011

"Say Oink Oink If You're Thankful for Football!" A DT Thanksgiving Card by Leigh S-B

Howzit Blockheads!
It's nearly time for the big Thanksgiving game!  Do you need some card inspiration for the guys in your life?  Will a Thanksgiving card that involves Football score a touchdown for you?  Then I've got a manly Thanksgiving card to share with you ;0)


I designed this little cutie just for the guys and used the Pumpkin digi stamp and Naughty Pig rubber stamp available exclusively from Blockheads Paper Arts.


I also used Marvy Le Plume Permanent Markers,  Distress Ink Pads, Distress Stain, Tim Holtz' Alterations Pocket Watches Texture Fade and masculine Tangle patterns to create this manly mans card that will surely delight the guy in your life!

Please visit my blog, Leigh S-B Designs, for the full project details with more photos!
Thanks for visiting with me today and as always....Happy Stamping :0)

Leigh S-B
THE SHARPIE DOMINO QUEEN

Wednesday, November 2, 2011

Tanglelicious Pumpkins Thanksgiving Card by Leigh S-B

Happy November Blockheads Fans!
Thanksgiving is a few short weeks away and I had fun creating this card featuring Blockheads Paper Arts new digi stamps.  I used their Pumpkin and Happy Thanksgiving images and Tangled up a storm.
Pop on over to my blog, Leigh S-B Designs, for the full tutorial!


I also used the following supplies which can you pick up in the Blockheads Paper Arts store:   
 Black N910, Orange O835, Ash Grey AG873, AG875 and 

It's a simple layout for a highly detailed image that packs a punch and I'm really pleased with how this one turned out!
 
I've got another Thanksgiving inspired card to come that's just for the guys so stay tuned!
Thanks for visiting with me today and as always....Happy Stamping :0)

Leigh S-B
THE SHARPIE DOMINO QUEEN

Saturday, October 29, 2011

"What's A Ghoul To Do But Eat De Chocolat" by Leigh S-B

Happy Halloween Everyone!

Here's another Halloween themed card featuring my favourite little Goth Girl and the new Mansion digi stamp just in case you need some last minute inspiration!  


Today Blockheads Goth Girl is a Ghoul Girl and she's trick or treating for chocolate at the Haunted Mansion!  Chocolate is the theme of this card in more ways than one so pop on over to my blog, Leigh S-B Designs, to find out what my surprise chocolatey ingredient is ;0)
All the colouring is done with the new Marvy Le Plume Permanent markers.


Have a spooktacular Halloween weekend!

Happy Stamping!
Leigh S-B
THE SHARPIE DOMINO QUEEN

Thursday, October 20, 2011

Zentangle'Ween Digi Stamp Projects by Leigh S-B

 Happy Thursday Blockheads Fans!

Have you been swept up by the Zentangle phenomenon? I sure have and I love it!
Of course it goes without saying that stampers have taken Zentangles further by doing them inside rubber stamped images and digi stamps. I had a little medical procedure done last week and in my down time I got some Zentangles done!  I hope you like them ;0) 

Today I'm sharing two Zentangle cards and a jumbo Tag I've made using Blockheads Paper Arts new line of Digi Stamps! Pop on over to my blog, Leigh S-B Designs, for all the details!  

I've got some Thanksgiving Zentangle projects in the works too so stay tuned for those ;0)


Happy Stamping!
Leigh S-B
THE SHARPIE DOMINO QUEEN

Monday, October 10, 2011

"Passion For Purple" Marvy Le Plume Permanent Markers Blending Tutorial by Leigh S-B

Hey Blockheads!
By now you've heard quite a bit about these new alcohol-based permanent markers called Le Plume Permanents by Marvy!  I posted my review on them on Sunday which you can read here if you missed it and now I'm back today with my first Blending Tutorial called "Passion for Purple"!


In this tutorial I'm showing you how I went about colouring the Goth Girl image I used on my 
"Miss Purple Poison" card and you can see the full tutorial for my card on my Blog.

I used four Le Plume Permanent markers from the Blue Violet range for this tutorial:
BV733, 736, 738 and 739.
  

Stacey and I worked together and came up with these nifty Blending Sets to help make things easier for you.  The Blending Sets give you a running start by taking the guess work out of which colours blend well together and ensure you start building your collection the right way right from the get go.  The Blue Violet Blending Set is now available from Blockheads Paper Arts and consists of BV733, 736 and 738.  My tutorial includes BV739 but it's not absolutely necessary to have the darkest shade at this time but if you really NEED to add BV739 to your set then please contact Stacey Dunning at Blockheads for more information.

So let's get started!

Stamp the image with Memento Tuxedo Black ink onto white cardstock that is suitable for alcohol-based markers like the Le Plumes and Copics.  Blockheads Paper Arts also now carries Neenah Solar White which is the recommended cardstock for all your Le Plume/Copic needs.

Step 1
Start by colouring in the areas with the lightest shade, BV733.


Step 2
At this point I've decided my light source is coming from above and to the front of the figure.
Lay in the first level of shading with BV736 which is a slightly darker shade
of purple. 


Step 3
Blend the two colours together by going over all the areas again with the lighter marker which is BV733.

Step 4
Lay in the next darker shade of purple, BV738.


Step 5
Blend everything together again with the lightest marker, BV733.


Step 6
Repeat Step 2 - 5 again on the dress and shoes and apply more of BV736 and 738
and blend everything together with BV733.   The folds in the dress have now taken shape and the figure has a sense of depth and dimension now.  I then moved onto her stockings.
Colour the white areas with BV736 and then lay in the shadow areas down the inside of both legs with BV738.  I didn't do any blending of these two colours because the sharper edge gives a better impression that a shadow is being cast.


Step 7
 Now this is where I start working with the darker of the 4 markers, BV739.  You can quite easily use BV738 or even black for these areas.  If you use BV738 instead just lay in the colour and then go over the same areas again a few more times.  This is what's awesome about alcohol-based permanent markers, you can go over the same area again and again and the colour gets darker each time.  So you can definitely get away with only 3 colours for now and get similar results!
Colour in the hair, the platform shoes, the cane and the black sections of the stockings with BV739.

Step 8
 Colour in the rest of the hair and blend over BV739 with the lightest marker, BV733.  At this point I could have added more shading and depth to the hair with BV738 but I went with BV739 which you'll see in the next step.  I also used BV733 on her gloves, corset and petticoat.


Step 9
Draw in some hair detail with BV739 and leave it as is.  There's really no rules, it's just a matter of personal preference really so you just go with the look you prefer!


Step 10
I filled in areas of the tuft at the top of her head with BV736 for more colour variation.


Step 11
I used Prismacolor coloured pencils on her skin and face details.  I then added the background and edged the deckle cut with a Prismacolor coloured pencil too.


Step 12
For even more drama I edged the deckle cut with a Black Prismacolor coloured pencil and finished off my Goth Girl with white highlights.  I used a combination of a white Gelly Roll pen and the new Marvy Le Plume White which is an opaque water-based marker.


She's pretty stunning decked out in purple head to toe isn't she!
And that concludes my first tutorial on how to blend with four Marvy Le Plume Permanent markers.  I hope you enjoyed it and that I've provided some insights into how to go about creating some awesome blends and giving your stamped images dimension with shading and shadows.  My tutorial also shows you how much fun you can have with just 3-4 markers.  Just start your collection by picking your favourite colour or the colour range that you find you use the most in your stamping and then select the Blending Set that will work for you!  The Blending Sets provide an inexpensive way for you test out the markers without breaking your crafty budget and allows you to have beautifully coloured images straight away too!  It's that easy!

If you're a Copic fan or are considering starting your own Copic collection then Blockheads has you covered too coz they're now carrying the Copic Sketch range and you can follow all of these Marvy Le Plume Tutorials with your Copics too!  Stacey has provided a Comparison/Substitute Chart so you can use the equivalent colours in your projects.

Stay tuned coz I have more Marvy Le Plume Permanent Tutorials full of tips and tricks to come!
Happy Stamping!
Leigh S-B
THE SHARPIE DOMINO QUEEN