Showing posts with label Blockheads Design Team. Show all posts

Wednesday, October 3, 2012

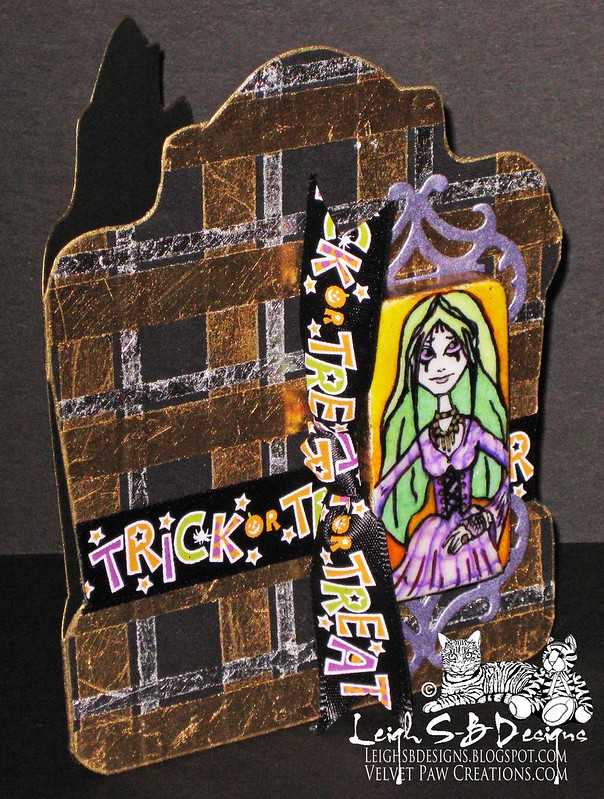
Gothic Trick or Treating by Leigh S-B

Precious Metals - A Compendium of Leafing Techniques 

Created by: Leigh Snaith-Brunton aka The Sharpie Domino Queen and Design Team Member

It's challenge time again at Blockheads Paper Arts and here's my first project featuring just one of the 6 Leafing techniques I've demoed in my challenge tutorial plus my signature 'Sharpie Domino Queen' technique on the altered domino!

This project also kicked of DominoART's 2nd annual 31 Days of Halloween which is being generously sponsored by Blockheads Paper Arts!  Pop on over to DominoART and haunt the blog all month long for the chance to win some surprise DominoART Treats!  DominoART is also participating in the Smeared and Smudged 31 Days of Halloween blog hop so there is plenty to see,  and do and win!  I'll hope you'll come and join all the spooktacular fun ;0)

Stamp Used: My favourite little Goth Girl has come out to play for Halloween again ;0)

For step by step instructions for this card, please visit my Oct 1st post on my DominoART Blog.

Friday, August 3, 2012

"Bird Song" Mini Vellum Book by Leigh S-B

 Created by: Leigh Snaith-Brunton, The Sharpie Domino Queen and Design Team Member


Description: I created a really cute mini book made out of vellum using a combination of stamped images coloured with water-based markers, Marvy Le Plume II and Distress Markers, and embossing folders for Blockheads' current technique challenge - Easy Mini Book Binding Techniques!


Stamp Set Used:  Frogs and Birds

For step by step instructions for this mini book, visit my full blog post on Leigh S-B Designs.

Wednesday, April 25, 2012

"Measure" Steampunk card featuring Lost Coast Designs by Leigh S-B

Created by: Leigh Snaith-Brunton aka The Sharpie Domino Queen and Design Team Member

Description: Steampunk card featuring border stamps by Lost Coast Designs to create a stamped basket weave background.  I used Marvy Le Plume Permament markers to colour everything in a grey monochromatic colour scheme.  You can also get the same effect with Copic markers too.  I also used the following tools to create my background panels:  Spellbinders Label Two dies, Tim Holtz Alterations Clocks Texture Fades embossing folder and the Cuttlebug Clockworks embossing folder.

Stamps Used:  Lost Coast Designs rubber stamps - all are available at Blockheads:  Steampunk Typewriter Girl, Measuring Tape border, Bingo border and Numbers border.

For step by step instructions for this card, visit my full blog post on Leigh SB Designs.

Wednesday, April 18, 2012

Using Border Stamps to create Fantasy Sci-fi Art Cards by Leigh S-B


Created by: Leigh Snaith-Brunton aka The Sharpie Domino Queen and Design Team Member

Come with me on a creative adventure into the world of fantasy sci-fi art cards featuring border stamps by Lost Coast Designs!

Stamp Sets Used: The following are by Lost Coast Designs and are available at Blockheads!
The following are Blockheads exclusives!

For step by step instructions for these cards, please visit my full blog posts on Leigh S-B Designs.

Sunday, April 1, 2012

Magic Metals Technique Projects by Leigh S-B


Created by: Leigh Snaith-Brunton aka The Sharpie Domino Queen and Design Team Member

Description: I've got two cards featuring the Magic Metals Technique Challenge!  I created fun faux embossed metal embellishments for my cards.

Stamp Sets Used: Proud As A Peacock, Verses Full Sheet, Botanical Silhouettes, Backgrounds for All Occasions and Vintage Light and Form.

For step by step instructions for these cards, visit my blog Leigh S-B Designs!

Direct links to my projects:
Faux Metal Postage Stamps Card
Faux Metal Peacock Feather Card

Wednesday, March 21, 2012

Proud As A Peacock Card Trio by Leigh S-B


Created by: Leigh Snaith-Brunton aka The Sharpie Domino Queen and Design Team Member

Over the last few days we, the Blockheads Design Team, have been sharing our 'Different Points of View' in celebration of the launch of the "Proud As A Peacock" stamp set!  Here's my 3 cards demonstrating the versatility of these wonderful stamp images by Blockhead stamp artist Di Davies.

Stamp Sets Used: Proud As A Peacock and Botanical Silhouettes from Blockheads.

For step by step instructions for all 3 cards, visit my blog at Leigh S-B Designs. Links to cards #1 and #2 are included in the post for card #3.

Wednesday, March 7, 2012

Two Bleach Technique Cards and a Numerology Card by Leigh SB

Created by: Leigh Snaith-Brunton aka The Sharpie Domino Queen and Design Team Member

I've got 3 projects to share with you today :0)

A Numerology DominoART card which features the Crafter's Workshop Template - Mini Numbers Collage and a Cuttlebug Numbers Embossing Folder.

For step by step instructions for this DominoART card, visit my full blog post on DominoART's Blog.

Also check out the two projects I designed for the current Blockheads blog hop - Bleach Technique Challenge!  I used Blockheads exclusive stamps on both, another Crafter's Workshop Template called Mini Time Collage and a Tim Holtz Texture Fades Clocks Embossing Folder.

Stamp Sets Used:  Nature Medallions,  Grunge It Up and Daisies Flower Set.

For step by step instructions for these cards, visit my full blog posts on Leigh SB Designs:  "Is It Spring Yet?" and "Spring Is Coming!"

Thursday, February 16, 2012

A "Thank You For Everything" Card by Leigh S-B

Created by: Leigh Snaith-Brunton aka The Sharpie Domino Queen and Design Team Member

I want to share a Thank You card I made for my BFF today!  She's dottie for circles - I mean seriously loves anything with spots on it and all her wall decor, rugs...you name it, has the circle motif going on!  So of course I couldn't resist getting dottie myself when I made her this card ;0).

Stamp Sets Used: Verses Full Sheet and Backgrounds For All Occasions from Blockheads.

For step by step instructions for this card, visit my full blog post on Leigh S-B Designs.

Thursday, February 9, 2012

French-African Themed Altered Tissue Box by Leigh S-B

Created by: Leigh Snaith-Brunton aka The Sharpie Domino Queen and Design Team Member

Feb 7th was my birthday and I had a fabulous day made even better coz I got to spend it stamping :0)  I also got to make something I've had on my list to do for ages too!  Every time I have a cold I always eye up the empty tissue box and say I can totally do something with this and then it gets thrown out.  So I finally did it and made a fancy tissue box to go in my French-African themed guest bathroom!

Stamp Sets Used: Feeling Regal and the French Script from Backgrounds for All Occasions which are all exclusive to Blockheads.

For step by step instructions for this project, visit my full blog post on Leigh S-B Designs.

Thursday, December 8, 2011

Naughty Christmas Mice - Wood Ornament featuring Sharpie Coloured Game Pieces by Leigh S-B

 Happy Friday Everyone!

Last week I shared my tradition of making porcelain Christmas tree ornaments with you all and now I'm back today with another two-sided Christmas ornament but this one is a lazor-cut wooden one with a two sided Sharpie coloured game tile center piece!  I decorated each side differently to show you two looks in one but you can make both sides the same if you want to of course!


The two naughty mice causing havoc on the Christmas tree from Blockheads Paper Arts' Figgy Pudding stamp sheet are the featured images on the Lexigo game tiles.  I used the mice from the top left stamp!


I also used Distress Stains, Fireworks Ink Spray and Smooch Spritz to create this whimsically playful yet elegant ornament!

Please pop on over to my blog, Leigh S-B Designs, and check out how I went about creating this one!


Happy Holidays!

Sunday, December 4, 2011

Christmas Porcelain Ornaments featuring Blockheads Paper Arts Christmas Stamps!

Happy December Everyone!
I'm back today with three awesome porcelain ornaments coloured with Sharpie markers that are perfect to hang on your tree, give as gifts and you can even add them as gift tag embellishments on your presents as an extra little giftie for family and friends!


 I make porcelain ornaments each year and get mine from Michaels.  I used Blockhead Paper Arts awesome Christmas stamp sets to decorate the ones I've made this year and here's the three stamp sets for you to check out.  Click on each sheet to go to Blockheads and the first 2 sets below are currently on sale so grab them while you can!


I also used the Ornate Flourish from the Feeling Regal set on the Star Ornament.


 Please visit my blog, Leigh S-B Designs, for the full project details with more photos!  There's only 21 days till Christmas and I hope I've given you some nifty ideas for gifts and for decorating your Christmas presents this year!
Happy Stamping and have an awesome weekend!

Leigh S-B
THE SHARPIE DOMINO QUEEN

Wednesday, November 2, 2011

Tanglelicious Pumpkins Thanksgiving Card by Leigh S-B

Happy November Blockheads Fans!
Thanksgiving is a few short weeks away and I had fun creating this card featuring Blockheads Paper Arts new digi stamps.  I used their Pumpkin and Happy Thanksgiving images and Tangled up a storm.
Pop on over to my blog, Leigh S-B Designs, for the full tutorial!


I also used the following supplies which can you pick up in the Blockheads Paper Arts store:   
 Black N910, Orange O835, Ash Grey AG873, AG875 and 

It's a simple layout for a highly detailed image that packs a punch and I'm really pleased with how this one turned out!
 
I've got another Thanksgiving inspired card to come that's just for the guys so stay tuned!
Thanks for visiting with me today and as always....Happy Stamping :0)

Leigh S-B
THE SHARPIE DOMINO QUEEN

Thursday, October 20, 2011

Zentangle'Ween Digi Stamp Projects by Leigh S-B

 Happy Thursday Blockheads Fans!

Have you been swept up by the Zentangle phenomenon? I sure have and I love it!
Of course it goes without saying that stampers have taken Zentangles further by doing them inside rubber stamped images and digi stamps. I had a little medical procedure done last week and in my down time I got some Zentangles done!  I hope you like them ;0) 

Today I'm sharing two Zentangle cards and a jumbo Tag I've made using Blockheads Paper Arts new line of Digi Stamps! Pop on over to my blog, Leigh S-B Designs, for all the details!  

I've got some Thanksgiving Zentangle projects in the works too so stay tuned for those ;0)


Happy Stamping!
Leigh S-B
THE SHARPIE DOMINO QUEEN

Monday, October 10, 2011

"Passion For Purple" Marvy Le Plume Permanent Markers Blending Tutorial by Leigh S-B

Hey Blockheads!
By now you've heard quite a bit about these new alcohol-based permanent markers called Le Plume Permanents by Marvy!  I posted my review on them on Sunday which you can read here if you missed it and now I'm back today with my first Blending Tutorial called "Passion for Purple"!


In this tutorial I'm showing you how I went about colouring the Goth Girl image I used on my 
"Miss Purple Poison" card and you can see the full tutorial for my card on my Blog.

I used four Le Plume Permanent markers from the Blue Violet range for this tutorial:
BV733, 736, 738 and 739.
  

Stacey and I worked together and came up with these nifty Blending Sets to help make things easier for you.  The Blending Sets give you a running start by taking the guess work out of which colours blend well together and ensure you start building your collection the right way right from the get go.  The Blue Violet Blending Set is now available from Blockheads Paper Arts and consists of BV733, 736 and 738.  My tutorial includes BV739 but it's not absolutely necessary to have the darkest shade at this time but if you really NEED to add BV739 to your set then please contact Stacey Dunning at Blockheads for more information.

So let's get started!

Stamp the image with Memento Tuxedo Black ink onto white cardstock that is suitable for alcohol-based markers like the Le Plumes and Copics.  Blockheads Paper Arts also now carries Neenah Solar White which is the recommended cardstock for all your Le Plume/Copic needs.

Step 1
Start by colouring in the areas with the lightest shade, BV733.


Step 2
At this point I've decided my light source is coming from above and to the front of the figure.
Lay in the first level of shading with BV736 which is a slightly darker shade
of purple. 


Step 3
Blend the two colours together by going over all the areas again with the lighter marker which is BV733.

Step 4
Lay in the next darker shade of purple, BV738.


Step 5
Blend everything together again with the lightest marker, BV733.


Step 6
Repeat Step 2 - 5 again on the dress and shoes and apply more of BV736 and 738
and blend everything together with BV733.   The folds in the dress have now taken shape and the figure has a sense of depth and dimension now.  I then moved onto her stockings.
Colour the white areas with BV736 and then lay in the shadow areas down the inside of both legs with BV738.  I didn't do any blending of these two colours because the sharper edge gives a better impression that a shadow is being cast.


Step 7
 Now this is where I start working with the darker of the 4 markers, BV739.  You can quite easily use BV738 or even black for these areas.  If you use BV738 instead just lay in the colour and then go over the same areas again a few more times.  This is what's awesome about alcohol-based permanent markers, you can go over the same area again and again and the colour gets darker each time.  So you can definitely get away with only 3 colours for now and get similar results!
Colour in the hair, the platform shoes, the cane and the black sections of the stockings with BV739.

Step 8
 Colour in the rest of the hair and blend over BV739 with the lightest marker, BV733.  At this point I could have added more shading and depth to the hair with BV738 but I went with BV739 which you'll see in the next step.  I also used BV733 on her gloves, corset and petticoat.


Step 9
Draw in some hair detail with BV739 and leave it as is.  There's really no rules, it's just a matter of personal preference really so you just go with the look you prefer!


Step 10
I filled in areas of the tuft at the top of her head with BV736 for more colour variation.


Step 11
I used Prismacolor coloured pencils on her skin and face details.  I then added the background and edged the deckle cut with a Prismacolor coloured pencil too.


Step 12
For even more drama I edged the deckle cut with a Black Prismacolor coloured pencil and finished off my Goth Girl with white highlights.  I used a combination of a white Gelly Roll pen and the new Marvy Le Plume White which is an opaque water-based marker.


She's pretty stunning decked out in purple head to toe isn't she!
And that concludes my first tutorial on how to blend with four Marvy Le Plume Permanent markers.  I hope you enjoyed it and that I've provided some insights into how to go about creating some awesome blends and giving your stamped images dimension with shading and shadows.  My tutorial also shows you how much fun you can have with just 3-4 markers.  Just start your collection by picking your favourite colour or the colour range that you find you use the most in your stamping and then select the Blending Set that will work for you!  The Blending Sets provide an inexpensive way for you test out the markers without breaking your crafty budget and allows you to have beautifully coloured images straight away too!  It's that easy!

If you're a Copic fan or are considering starting your own Copic collection then Blockheads has you covered too coz they're now carrying the Copic Sketch range and you can follow all of these Marvy Le Plume Tutorials with your Copics too!  Stacey has provided a Comparison/Substitute Chart so you can use the equivalent colours in your projects.

Stay tuned coz I have more Marvy Le Plume Permanent Tutorials full of tips and tricks to come!
Happy Stamping!
Leigh S-B
THE SHARPIE DOMINO QUEEN


Friday, October 7, 2011

"Miss Purple Poison" - A Blockheads Design Team Card by Leigh S-B

Howzit Stampers!
There's a new permanent marker in town worthy of being a rival for Copics and guess what, they're more affordable and just as awesome and they're now available at Blockheads Paper Arts just in case you missed seeing Stacey's previous posts!
I've been having a blast experimenting with them and today I'm sharing a Halloween themed card I made using the new Marvy Le Plume Permanents markers and soon I will be sharing a step-by-step Blending tutorial demonstrating how I went about colouring the image featured on my card as well as a product review here on the Blockheads Blog!  So keep an eye out for those!
SUPPLIES
Blockheads Paper Arts rubber stamps:
Flourishes (partial of the Bird Cage stamp) from Victorian Eccentricities

Marvy Le Plume Permanent markers:  BV733, 736, 738, 739 and OP920 White
Prismacolor pencils:  Cream, Blush Pink, Parma Violet, Red Violet and Black
Three shades of purple cardstock
Recollections Paper Border Toxic Labels
Decorative silk ribbon
Spellbinders Dies:  Fleur De Lis and Deckle Rectangle dies
Tim Holtz Alterations Raven and Scardy Cat die
Fleur De Lis Corner Punch (brand unknown)
Scissors
 
 Pop on over to my blog, Leigh S-B Designs, for the full tutorial!
Have an awesome weekend!
Happy Stamping!
Leigh S-B
THE SHARPIE DOMINO QUEEN

Saturday, October 1, 2011

'Madeline Usher' Cameo Necklace by Leigh S-B

Happy World Card Making Day Everyone!

 A few days ago I shared my 'Bride of Usher' art card and promised you a matching Necklace and here it is, I hope you like it ;0)  I should have shared the card today instead with it being World Card Making Day and all, silly me!


 If you're a fan of Tim Holtz Idea-ology goodies then you're going to love this project coz I used one of his tarnished gold Ornate Plates as the frame for my spooky miniature 'portrait painting' of
Madeline Usher!

I used the same Goth Girl stamp from  Blockheads Paper Arts exclusive Di's Characters rubber stamp collection as the focal point of my dark and twisty Cameo Necklace as well as the Script 'Backgrounds for All Occassions' stamp for the backing of this piece.  I had a spooktacular time designing this and the matching art card!

Pop on over to my blog, Leigh S-B Designs, to see the full tutotrial as well as two more 'looks' I created for this spooky antique piece!

Supplies 
Goth Girl and Script stamps available from Blockheads Paper Arts

Ink pads: 
Brilliance Lightning Black, Memento Tuxedo Black 
E000, E41, W1, W5 and Black 110 
Cream, Chartreuse,  Crimson Lake, Black Cherry and Black
Xyron Permanent Adhesive
Jewelry Findings and tools
Assorted glass beads
Dark Plum suede cord


Stacey hinted in her recent newsletter that a domino necklace might have been in the works for this project and I hate to disappoint so check out the Goth Girl DominoART Necklace I did make a while ago in case you missed seeing it ;0)

Happy Stamping!
Leigh S-B
THE SHARPIE DOMINO QUEEN

Thursday, September 29, 2011

'The Bride of Usher' - A Dark & Twisty Halloween Card by Leigh S-B

Howzit Stamping Friends!
October is a few days away and you all know what that means...it's Halloween Time!!  To get you in the spooky spirit here's a Blockheads design team project for you to check out!  Pop on over to my blog, Leigh S-B Designs, for the full tutorial with step-by-step photos!  I've also got a matching necklace to share so stay tuned ;0)
I used Blockheads Paper Arts exclusive rubber stamp called Goth Girl from the Di's Characters collection as the focal point of my dark and twisty art card as well as the Script 'Backgrounds for All Occassions' stamp for the background and accent stamping.  I had a spooktacular time designing this one and the Goth Girl image is actually quite versatile coz I was able to turn her into a scary Bride by making most of her hair look like a wedding veil which was just perfect for the theme I had in mind for this project!

Happy Stamping!
Leigh S-B
THE SHARPIE DOMINO QUEEN

Thursday, September 22, 2011

"Congratulations" Christening Art Card - Combining Stamping and Dry Embossing With Digital Design!

Howzit Stampers!
I'm back today to show you the very special art card I made for my Nephew and Godson's Christening!  I was inspired by my recent W.O.W art cards I've been playing with for the last few weeks and combined some elements from them with digital design to create this elegant card my Sissypoo will treasure forever.

 
I used the 'Congratulations' sentiment stamp from Blockheads Paper Arts exclusive Verses Full Sheet for the inside of my card.


I hope you'll stop by my blog, Leigh S-B Designs, to see my tutorial and photos :0)


Until next time, keep stamping!
 Leigh S-B
THE SHARPIE DOMINO QUEEN

Thursday, September 15, 2011

Hello Blockheads!
I'm back today with the finale of my W.O.W series of Art Cards!  This is Part 4 of my creative adventures into exploring White on White Embossed and Die Cut Layering.  This layering technique is so much fun and the results truly are WOW!


Over the last couple of weeks I've been playing with creating dramatic effects by layering different shades of embossed and die cut white cardstock.  I absolutely love how the combined textures and the play with shadows gives the cards a richness that's filled with luxurious drama!

I've also had the pleasure of incorporating sentiments/sayings and words from Blockheads exclusive Verses Full Sheet set of stamps into my W.O.W art cards.  This versatile stamp set is available unmounted or on cling cushion and a must-have for your collections!


Please pop on over to my blog, Leigh S-B Designs, and check out my latest W.O.W Art Card.  You'll also find links to Part 1 - 3 there too if you missed them!  

Have a great weekend and Happy Stamping!
Leigh S-B
THE SHARPIE DOMINO QUEEN