| Created by: Karen McAlpine, Design Team Member Description: Christmas card and decorated envelop with stamping, masking, and Copic markers on Neenah CS. Stamp Set Used: An Illustrated Christmas from Blockheads. For step by step instructions for this card, visit my full blog post on Dreaming and Creating. |

Showing posts with label An Illustrated Christmas stamp set. Show all posts
Showing posts with label An Illustrated Christmas stamp set. Show all posts
Saturday, December 15, 2012
Holly Christmas Card Colored with Copics


Thursday, November 24, 2011
How To Colour A Vintage Santa - Marvy Le Plume Permanent/Copic Markers Tutorial by Leigh S-B!
Happy Thanksgiving Everyone!
I'm super delighted to be back today with another Marvy Le Plume Permanent markers 'How To' tutorial! I'm featuring the Marvy Le Plume Permanents in a series of tutorials but you can follow along easily with Copic markers too! Stacey, the wonderful owner of Blockheads Paper Arts, has provided a great Marvy to Copic substitute Chart to take the guess work out of it for you! So grab your markers and lets get started on 'How To Colour A Vintage Santa'!
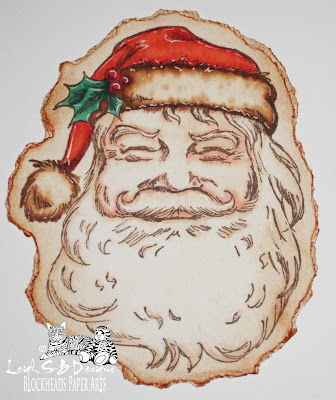
In this tutorial I'm going to show you how to colour this gorgeous Santa image which is on the exclusive Blockheads Paper Arts An Illustrated Christmas stamp sheet by mainly using the Marvy Le Plume Permanent Blending Pen N900 (or Copic 0 Colourless Blender) to blend and soften the colours. This is a great technique for colouring 'white' areas in your stamped images for a beautiful subtle effect!

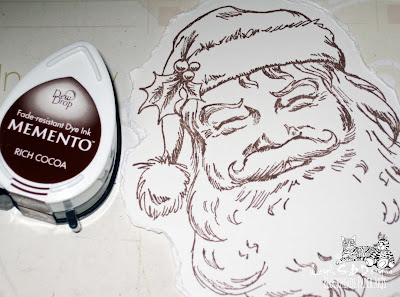
Stamp Santa onto Neenah Solar White cardstock with Memento Rich Cocoa ink.
I tore the edges of my Santa coz I was going for a vintage distressed look for the card I used him on.
You can see my finished card on my blog at Leigh S-B Designs!
We are going to use the following Marvy Le Plume Permanent markers:
N900 Blending Pen
Red (R) 812, R815, R817
Orange Red (OR) 823, OR827
Orange Yellow (OY) 848
Green (G) 673, G679
as well as a red Prismacolor pencil, a white gel pen and Tea Dye Distress Ink
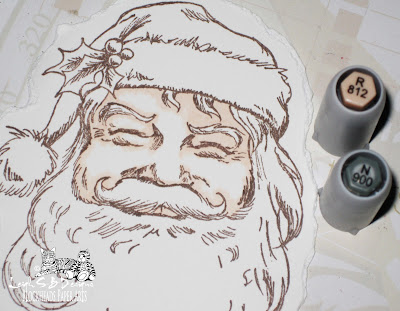
Apply R812, which is a pale flesh colour, by outlining just the stamped lines of the face and filling in more of the 'shadow' areas. I decided my light source was coming from the front and slightly to the left so the right side of Santa's face will be more shadowed. Go over all the colour with the Blending pen (N900) to soften the harsh edges. Don't worry about going over the stamped image because the Memento ink doesn't smear and is perfect for use with alcohol-based markers.
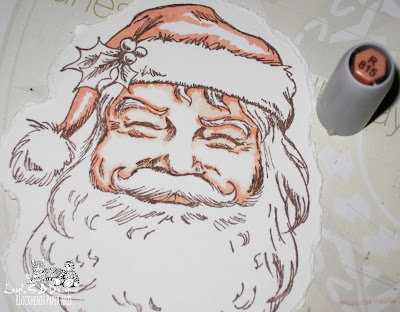
Apply R815 to the same areas of the face but concentrate more on where the 'shadows' would be. So mainly along Santa's brow where his hat sits, his eyebrows coz remember he does have bushy eyebrows, the creases of his eyes, nose and along his beard line. I also started on his hat at this point. I used R815 as the highlight areas on his hat so I started with the lightest colour.
Apply R815 to the same areas of the face but concentrate more on where the 'shadows' would be. So mainly along Santa's brow where his hat sits, his eyebrows coz remember he does have bushy eyebrows, the creases of his eyes, nose and along his beard line. I also started on his hat at this point. I used R815 as the highlight areas on his hat so I started with the lightest colour.
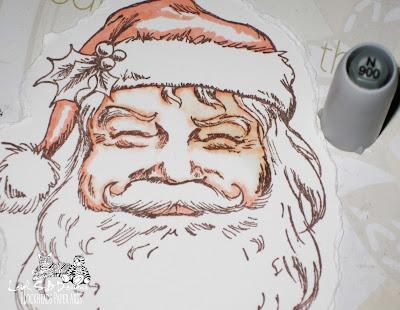
Back to the face - blend all the R815 areas with the Blending pen.

Back to the hat - build up the colour on Santa's hat with R817.
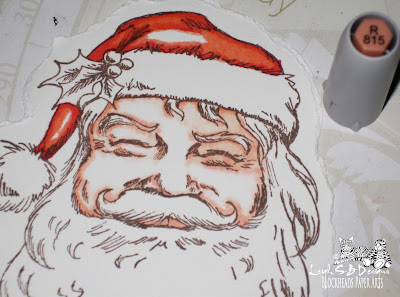
Blend all the R817 areas by using R815 as the blending tool instead of the colourless Blender this time.

I added more R817, blended with R815 and did the same again until I was happy with the result.
Usually a stamp image will indicate for you where your shadows should be with cross hatching or darker lines which darkens particular areas. So in this case that's where I concentrated applying the darker red areas on the hat.
Usually a stamp image will indicate for you where your shadows should be with cross hatching or darker lines which darkens particular areas. So in this case that's where I concentrated applying the darker red areas on the hat.
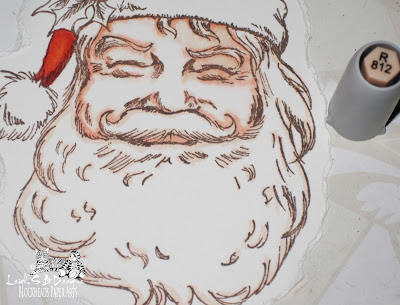
Now for his beard, mustache and eyebrows - I lightly applied R812 on and around the stamped lines of all the hair areas.
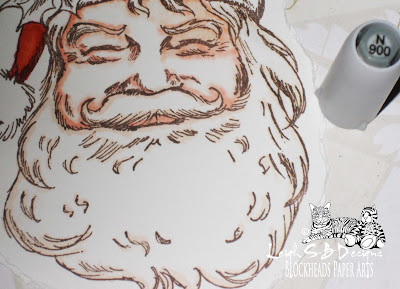
Go over all the same hair areas again with the Blending pen (N900) to soften the harsh edges.
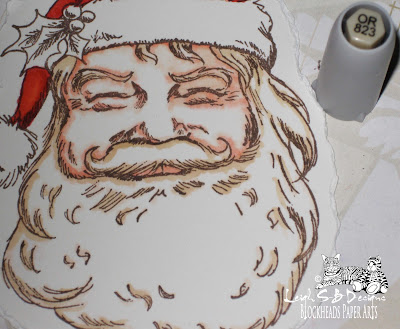
Apply OR823 to the same areas to add shading and depth to the hair and blend again with N900 (Blending pen).
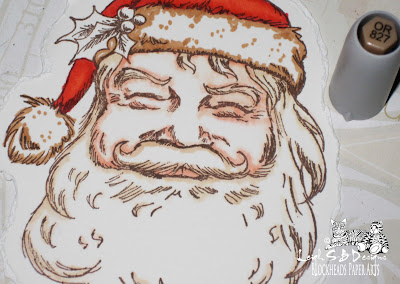
Apply OR827 to the white fluffy hat areas, concentrating the colour around the edges where the shadows would be.
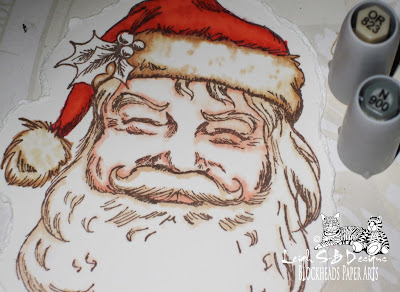
I blended over the same areas with OR823 to lighten and soften and then further blended away the sharp edges with N900 as the first step for this area to get a feel of where I wanted the colour to be for the white fluffy areas of Santa's hat. I'm using the sepia tones coz don't forget he's a vintage Santa!
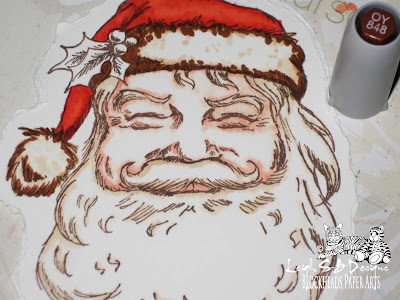
Apply OY848 for darker shading and depth.

Fill in with more OR827 and OR823, getting lighter towards the center of the white areas of Santa's fluffy hat. Don't forget to work on his hat pompom at the same time! Blend, soften and lighten the same areas with N900.
Tip: the Blending pen acts more like a bleaching agent and will lighten and leach away colour and you can get a nice watercolour effect. You can see that effect nicely in the white hat area in the photo below! You can also see I got some overbleed of the brown colour into the face area coz I used the Blending pen a lot but that didn't bother me coz it just looks like a shadow cast by the fluffy hat, especially when you're not looking at the image sooo closely ;0)
Tip: the Blending pen acts more like a bleaching agent and will lighten and leach away colour and you can get a nice watercolour effect. You can see that effect nicely in the white hat area in the photo below! You can also see I got some overbleed of the brown colour into the face area coz I used the Blending pen a lot but that didn't bother me coz it just looks like a shadow cast by the fluffy hat, especially when you're not looking at the image sooo closely ;0)
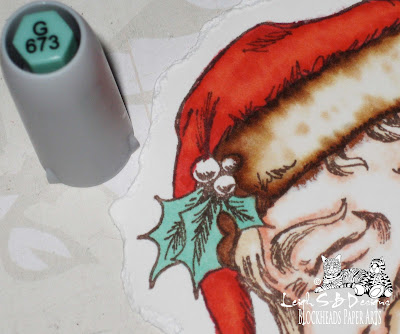
Now for the holly - colour in all the holly leaves with G673.

Add shading and depth to the leaves by applying G679 in the shadow areas which is basically where all the leaf detail and cross hatching of the stamped image is and make it darker where the leaves go under the berries.
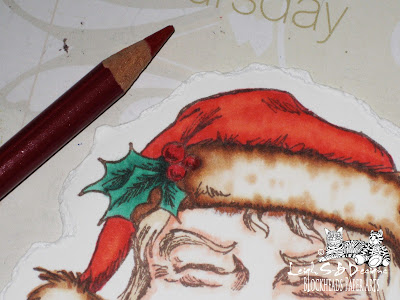
I wanted the berries to be appear more solid and opaque so they'd stand out from Santa's hat so I used a red Prismacolor pencil to colour them.

Finish off by applying highlights to the image with a white gel pen.
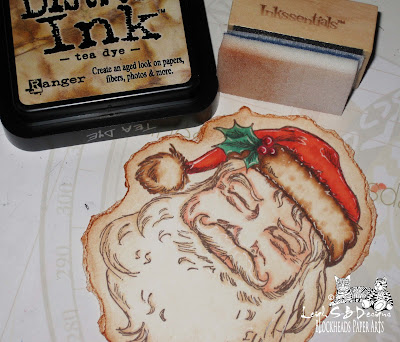
To complete my vintage Santa I aged the image by applying Tea Dye Distress Ink with an Ink Blending tool.

Here's my vintage Santa on the card I made for the Blockheads 'Sanded Colour Block' Technique Challenge! There's still plenty of time to join in the challenge for a chance to win the $25 gift certificate! You can read all about it here on the Blockheads Blog!
Then pop on over to my blog to see how I incorporated the technique into my card.
I hope you enjoyed my second tutorial on how to use Marvy/Copic markers. Click here if you missed tutorial #1 - "Passion for Purple" which is a blending tutorial demonstrating how to colour an entire image just using 4 shades of purple!

Then pop on over to my blog to see how I incorporated the technique into my card.
I hope you enjoyed my second tutorial on how to use Marvy/Copic markers. Click here if you missed tutorial #1 - "Passion for Purple" which is a blending tutorial demonstrating how to colour an entire image just using 4 shades of purple!
Thanks for joining me today and have a wonderful holiday weekend!
Happy Stamping :0)
Happy Stamping :0)
Leigh S-B
THE SHARPIE DOMINO QUEEN
Sunday, November 20, 2011
Snowman Christmas Tag

Marvy Le Plume Permanent Marker sets grass green, orange and cool gray
silver paint and cranberry dabber
picket fence, rock candy Distress Stickles
copper, pool and snow cap Adirondack Alcohol Inks
foil tape
#8 tag
seafoam white embossing powder
embossing ink
spellbinders fancy tags 2
Snowflurries and Snowman Texture Fades
snowflake stamp from Winter Wonderland set
white versamagic ink
black cardstock
Neenah Classic Crest Solar White paper
liquid pearls
various ribbons
I used the markers to color and highlight the carrot, scarf and hat on the snowman. I then took a little brown pigment ink on a sponge to add a little paper aging around the edge of the snowman. I cut his arms off for this tag to minimize the fussy cutting. I added picket fence distress stickles to some of the greenery and rock candy distress stickles to the snowman. The liquid pearls were added to the center of the snowflakes I cut out for the center of the bottom greenery arragement.
 By apply copper, about half as much pool and about 1-2 drops of snow cap mixative alcohol inks to your alcohol ink applicator tool you can turn regular silvertone foil into a copper with aged patina.


I applied the foil tape to the front of a #8 tag and trimmed it to fit. I ran both the foil and tag through my cuttlebug with the Snow Flurries texture fade embossing folder.

The raised snowflakes weren't as obvious as I'd wanted, so I applied some copper alchol ink lightly to the surfaces of the raised areas and that really brought out the design.

I rubbed an embossing ink pad over the surface and sprinkled white emobssing powder over top. I didn't want htis much coverage so I wiped awa as much as I could. My embossing ink was quite sticky so I had to use a wet paper towel to get as much as I wanted off.

After heating the embossing powder, this was my final background. Now all I had to do was use a little liquid glue to apply all the little items I'd created to complete my tag.
Thursday, November 3, 2011
Mischievous Mice Christmas Card
Hello Blockheads,
We are continuing the Holiday theme here on the blog. I have a Christmas Card for you today using the one of the new Christmas sets: Figgy Pudding Mice.
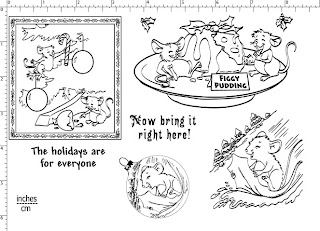
I used a non-traditional color scheme for my card. It is fun to change things up a bit with some fun colors.


For a materials list click over to my blog, Dreaming and Creating. Hope you are having a great day!
Karen McAlpine
We are continuing the Holiday theme here on the blog. I have a Christmas Card for you today using the one of the new Christmas sets: Figgy Pudding Mice.

I used a non-traditional color scheme for my card. It is fun to change things up a bit with some fun colors.

The image is color with Copic Markers. Here is a close up of the coloring.

For a materials list click over to my blog, Dreaming and Creating. Hope you are having a great day!
Karen McAlpine
Friday, October 28, 2011
Vintage Framed Santa
Hi Blockheads!
I have a Vintagey project to show you today. I used on of the new Christmas images from "An Illustrated Christmas". Have you checked out this new set? It is fabUlous! Here is the set.

I used the Santa for the "picture" in an altered Frame (size is 6 1/2 inches). I stamped Santa on canvas paper and turned a plain frame into a festive, vintagey piece of art. This will be a great piece for the mantel, coffee table, or the wall during the Holiday season.

For materials, instructions and more photos (including the before of the frame) click over to my blog, Dreaming and Creating. I also tell you how to make that ribbon treatment. Have a great day, and I hope you can find some time to relax and enjoy stamping this weekend.
Karen McAlpine
I have a Vintagey project to show you today. I used on of the new Christmas images from "An Illustrated Christmas". Have you checked out this new set? It is fabUlous! Here is the set.

I used the Santa for the "picture" in an altered Frame (size is 6 1/2 inches). I stamped Santa on canvas paper and turned a plain frame into a festive, vintagey piece of art. This will be a great piece for the mantel, coffee table, or the wall during the Holiday season.

For materials, instructions and more photos (including the before of the frame) click over to my blog, Dreaming and Creating. I also tell you how to make that ribbon treatment. Have a great day, and I hope you can find some time to relax and enjoy stamping this weekend.
Karen McAlpine
Subscribe to:
Posts (Atom)