Showing posts with label Christmas. Show all posts

Wednesday, December 26, 2012

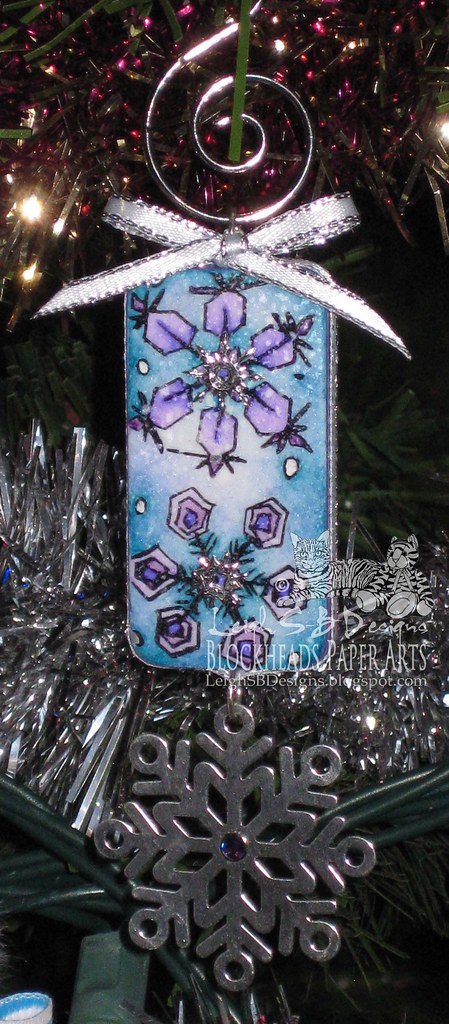
"Amethyst Snowflakes" Domino Ornament by Leigh S-B


Happy Boxing Day Everyone!
I hope Santa was really good to you yesterday ;0)  If you plan to get some stamping done today how about starting next year's Christmas projects early!  Try your hand at some altered game piece ornaments and get a head start on 2013 ;0)  Blockheads has some wonderful seasonal/holiday stamp sets which you can check out here!

"Amethyst Snowflakes" Domino Ornament created by Leigh Snaith-Brunton aka The Sharpie Domino Queen and Design Team Member.

Description: DominoART Christmas Tree Ornament using my signature "The Sharpie Domino Queen" technique.

Stamp Set Used: Stackable Tiles Christmas stamp set from Blockheads.

For step by step instructions for this DominoART creation please visit my full blog post on my DominoART blog.

While you are there have a look at all the wonderful altered game art created by my Merry Players in DominoART's 24 Days of Christmas Festival, a big THANK YOU to Blockheads for sponsoring the grand prize!  Feast your eyes on 24 magical creations and then vote for you favourite 3!  Everyone has 10 votes each and you will have until Dec 28 noon PST to decide on your 3 favourites! The winners will be announced on Dec 29!  Place your votes via the inlinkz thumbnail collection found on the Day 24 post or go to the 24 Days of Christmas page.  

Tuesday, December 4, 2012

Vintage Cover Box with Paper Artsy


Created by: Karen McAlpine, Design Team Member

Description: Tissue Paper covered paper mache box. Stamped with Brilliance inks.
Size: 4 1/2" square; 2 1/2" high

Stamp Set Used: Holiday Theatre - Paper Artsy and Gunge It Up  from Blockheads.

For step by step instructions for this card, visit my full blog post on Dreaming and Creating.

Tuesday, November 27, 2012

Dreamy Madonna Christmas Card with Paper Artsy


Created by: Karen McAlpine, Design Team Member

Description: Christmas Card with background made with Distress Markers and Metallic Stains-Ranger.
Size: 4 1/4" x 5 1/2"

Stamp Set Used: Babushka Balloon Paper Artsy available from Blockheads.

For step by step instructions for this card, visit my full blog post on Dreaming and Creating.

Tuesday, November 20, 2012


Created by: Karen McAlpine, Design Team Member

Description: Pink Christmas card with background made with Distress Reinkers and Metallic Distress Stains from Ranger.
Size: 4 1/4 x 5 1/2 "

Stamp Set Used: Babushka Balloon from paper Artsy available  from Blockheads.

For step by step instructions for this card, visit my full blog post on Dreaming and Creating.

Tuesday, October 23, 2012

Glitzy Santa Tag


Created by: Karen McAlpine, Design Team Member

Description: Tag made by covering surface with Ranger Metallic Stain, stamping with pigment ink, and heat embossing.

Stamp Set Used: An Illustrated Christmas from Blockheads.

For step by step instructions for this card, visit my full blog post on Dreaming and Creating

Friday, December 16, 2011

A Trio of Snowman Cards

Hello Blockheads!!
Today I have a trio of Snowman cards to help you with those last minute Christmas Cards.  I used the Snowman image from An Illustrated Christmas set.


Here is my trio of Snowman Cards.
There is a complete materials list over on my blog, Dreaming and Creating.  Have a great day!!
Karen McAlpine


Thursday, December 8, 2011

Naughty Christmas Mice - Wood Ornament featuring Sharpie Coloured Game Pieces by Leigh S-B

 Happy Friday Everyone!

Last week I shared my tradition of making porcelain Christmas tree ornaments with you all and now I'm back today with another two-sided Christmas ornament but this one is a lazor-cut wooden one with a two sided Sharpie coloured game tile center piece!  I decorated each side differently to show you two looks in one but you can make both sides the same if you want to of course!


The two naughty mice causing havoc on the Christmas tree from Blockheads Paper Arts' Figgy Pudding stamp sheet are the featured images on the Lexigo game tiles.  I used the mice from the top left stamp!


I also used Distress Stains, Fireworks Ink Spray and Smooch Spritz to create this whimsically playful yet elegant ornament!

Please pop on over to my blog, Leigh S-B Designs, and check out how I went about creating this one!


Happy Holidays!

Sunday, December 4, 2011

Christmas Porcelain Ornaments featuring Blockheads Paper Arts Christmas Stamps!

Happy December Everyone!
I'm back today with three awesome porcelain ornaments coloured with Sharpie markers that are perfect to hang on your tree, give as gifts and you can even add them as gift tag embellishments on your presents as an extra little giftie for family and friends!


 I make porcelain ornaments each year and get mine from Michaels.  I used Blockhead Paper Arts awesome Christmas stamp sets to decorate the ones I've made this year and here's the three stamp sets for you to check out.  Click on each sheet to go to Blockheads and the first 2 sets below are currently on sale so grab them while you can!


I also used the Ornate Flourish from the Feeling Regal set on the Star Ornament.


 Please visit my blog, Leigh S-B Designs, for the full project details with more photos!  There's only 21 days till Christmas and I hope I've given you some nifty ideas for gifts and for decorating your Christmas presents this year!
Happy Stamping and have an awesome weekend!

Leigh S-B
THE SHARPIE DOMINO QUEEN

Friday, December 2, 2011

Poinsettia Digi Image Christmas Card

Hello Blockheads!
Today I have another Christmas Card to share with you. And, hopefully,  to inspire and give you ideas for making your own Holiday Cards.   This card uses a digital image from Blockheads Paper Arts.   The Poinsettia image is from the A2 Card Set 1-Digi Stamps.   Here is my card.


The image was colored with Copics and Le Plume Markers.   For a complete materials list and more photos, click over to my blog, Dreaming and Creating.  Have fun!

Special Note and Reminder: THE BLOCKHEADS DESIGN TEAM CALL is open until Dec 20th.  


Karen McAlpine

Friday, November 18, 2011

New Holiday Dies are In


New! Sizzlits Decorative Strip Die - Festive Greenery
Come see what's new at Blockheads!
We just got all the new Tim Holtz holiday dies by Sizzix.  You'll find all those items by clicking above.  This is one of my favorites, the Festive Greenery.  I like it though because it's versatile.  In this tag I used it as it is traditionally inteded but see below where it just made some nice embellishments but didn't look like "greenery".  The swirls are great for all seasons as are the leaves and greenery.  I started by just finding all my old scraps 2" wide or more and running through in several different places on the die.  It wasn't long before I ended up with this great big pile of goodies.  I started using paint dabbers on the ones with colors I didn't like and adding distress stickles to the ones that didn't need a color change and suddenly I had a little pile to choose from for my tag.  I didn't use all of these so I have more projects planned!  I think they would look wonderful colored silver for a winter scene.
Stamps: Illustrated Christmas
This card was made with the new Tim Holtz Signature line of Kraft Core'dinations.  Sanding it reveals a kraft colored cardstock.

Monday, November 7, 2011

More Mischievous Mice

Hi Blockheads!
I have more mischievous Mice from the Figgy Pudding Mice set today!  I think these images are just a scream and so cute.  Here is what the whole set looks like.


This set is great for using with your Copic or Marvy Markers.  I colored this image with Copics and added some Christmas colored accents.


There is a materials list on my blog , Dreaming and Creating.  Hope you are having a great Monday!
Karen McAlpine

Thursday, October 27, 2011

4-Sided Spellbinders Ornaments


I created these ornaments with Spellbinders Labels Sixteen and our coordinating digital images (which come free with the purchace of the Labels Sixteen die set).  I simply printed the PDF on Cryogen Curious Metallics Cardstock and colored 2 of the large frames and two of the framed verses using Marvy Alcohol Markers.  In a step coming up, I will cover these dies with clear glass Micro Marbles and I find the easiest way to do that is to apply double-sided industrial strength red liner tape before die cutting the images so I can cut the tape and paper at the same time. 

Red liner tape tends to gum up punches but it works great with dies, with no sticky mess at all.  The red liner tape and marbles are optional.  You'll see in a second similar ornament where I added marbles only to the edges after the ornament was fully constructed.  Whether you're die cutting just the cardstock alone or with red liner tape, you'll want to secure the die to the image with a removable tape.  I use Post-It tape because it peels off the cardstock easily without tearing it or leaving any residue.  It doesn't adhere strongly to the red plastic liner on the tape so if you get frustrated, try a stronger tape.  Strangely, the dies cut through the tape and the cardstock but don't cut through the liner.  This is part of the reason it's such a clean process.  Simply peel the image and tape away from the liner.  The frame of the cardstock will stay adhered to the liner so you can throw that all away unless you cut the tape and cardstock cleanly enough that you can use it for another project.

Your tape covering the image is exposed at this point so go ahead and apply your Micro Marbles using a tidy tray or box lid before the tape gets stuck to something.  I started with a few of the 1mm marbles, then covered the rest of the tape with .5mm marbles and then filled in all the gaps by adding a final layer of Micro Marble sand.  I poured off the excess marbles with each step back into their containers so I didn't contaminate my sizes.

Do these same steps for any of the layers you plan to cover with marbles.  I did two large panels and two small panels.  The ornament requires 4 large panels so I cut two plain red large shapes and centered the smaller framed verses onto the red panels and drew some doodles using a gold metallic paint pen on the exposed red panel.  You'll want to fold all 4 large panels diagonally in half as shown.  The panels covered with marbles fold easily.  I used 1/8" red liner tape around the back edges of each panel to secure all four into a star shape.  I've used ATG tape for this in the past and found the panels pulled apart over time.  Before securing the final two panels I folded a single strand of 14K Gold Mizuhiki cord in half and then in half again using the double loop end as the hanger for the ornament hook.  I used a small 1/8" piece of red liner tape to wrap the top of the strands so the loop doesn't slip and snipped the single loop at the bottom to make a sort of tassel.  After securing the final panels of the ornament I twisted the bottom of the Mizuhiki tassel strands around a skewer to shape them.

The above left photo was taken in noraml light with no flash and the photo on the right was taken in low light with a flash to demonstrate how the clear marbles can really sparkle in the tree lights at night. 

Below is an example that also uses our digital file but also uses stamped images from our Illustrated Christmas and Figgy Pudding Christmas stamp sets.   I didn't add any redliner tape or marbles to the surfaces of the panels so the ornament has less weight than the ornament above.  I added 1/8" red liner tape folded over the edges of the panels and covered them with 1/2mm Clear Micro Marbles.  The marbles made a big difference in the look and feel of the ornament, and kept it from feeling like a paper disposable ornament.